Feature:
1. [USB Rechargeable] Eliminate the need for power cord with this cordless hair dryer that can be charged via USB, allowing for convenient use anywhere after a full charge.
2. [Split Design] The hairdryer features battery and air duct split design, with USB output interface, serving as a portable power bank to charge devices like smartphones.
3. [4 Level Battery Display] Easily see battery levels during use with the intuitive LED display, ensuring you always know the remaining power at a glance.
4. [Ergonomic Handle] Designed with ergonomic principles in mind, the handle offers a lightweight and comfortable grip for ease of use.
5. [Noise Reduction] Built in turbocharging and noise reduction system, the hairdryer delivers a 15percent increase in airflow while reducing noise by 10percent , providing a powerful and quiet drying experience.
Specification:
Item Type: Cordless Hair Dryer
Material: Nylon
Battery: Lithium battery 18000mAh (built in)
Rated Power: 280-330W
Function: Cold and hot air (adjustable)
Charging: Direct charge and base charge
Assembled Size: Approx. 273 x 100 x 65mm / 10.75 x 3.94 x 2.56in
Use:
1. School dormitory hairdressing and hair drying, art projects, and art joint exam painting drying, etc.
2. Outdoor painting, sketching, and hair drying
3. Heating or drying other objects outdoors
4. Hair drying during travel or swimming
5. Applying film to cars and phones
6. Thawing and cleaning snow or ice on car windshields and mirrors in cold weather
Tips for Use:
1. Select temperature and wind speed: In summer and autumn, use high speed wind with warm or medium temperature for hair drying, while in winter and spring, use medium wind speed with hot air. Adjust according to the user actual situation and occasion.
2. Avoid completely draining the battery, charge when it reaches 20percent or when the power is insufficient or wind weakens. Timely turn off the battery switch and completely charge it, otherwise repeated use of the switch will easily damage the battery cells.
3. Clean the debris and dust on the air inlet grille periodically to prevent blockage and damage to the internal electronic components. Use a dry cloth for cleaning.
4. If the hair dryer is not in use temporarily, it needs to be completely charged and stored. Occasionally, it needs to be taken out for blowing and charging to avoid long term aging of electrical components and maintain battery life (to avoid battery depletion and damage). It is generally recommended to take it out and charge it after 2 to 3 months of inactivity.
5. The main battery switch of the hair dryer needs to be turned off when not in use to avoid the power indicator light and internal electronic components consuming power, in order to save energy and guard the battery.
6. If not used for a long time, store the handle and air duct separately, keeping the battery charged.
7. For initial charging, keep it charged for at least 8 hours.
8. This product contains too many precise electronic components, such as battery pack, battery management circuit, host microchip control, etc. Please do not collide or drop them under excessive force like ordinary hair dryers to avoid damage to internal components.
Usage Steps and Instructions:
1. When charging, first plug the charger into household electricity, and then directly insert the DC head of the charger output terminal into the circular DC hole of the battery for direct charging, or insert the DC head of the charger into the circular DC hole of the charging dock, and then plug the battery into the charging dock for charging. Generally, it takes 3 to 4 hours to completely charge.
2. When charging, it is necessary to turn the power switch on the battery to the I position in order to charge it properly. At this time, the battery level indicator light will light up. During the charging process, the indicator light on the charger is red, which represents the charging status. When the indicator light switches to green, it means it is completely charged. During the charging process, the battery level will gradually light up as the charging progresses, and the full charge light will turn on. Note: It is recommended to use the conversion light on the charger as the standard to determine whether the battery is completely charged. The green conversion light on the charger indicates full charge.
3. When installing the battery, first check whether the two pins at the end of the air duct are dirty and clean them. Then, push the battery lock at the back of the air duct to the left and insert the positioning point on the battery in the direction of the arrow. After the battery is installed in place, push the battery lock to the right and close it.
4. When using, first turn the battery main switch to the 1 position, and then press the wind speed or temperature button to start. Choose the temperature and wind speed of the hair dryer according to your own situation, with a total of 12 modes. The left button represents temperature control, which is divided into three levels. The first level is for warm air (green indicator light), the second level is for medium temperature (blue indicator light), and the third level is for hot air (red indicator light). The button on the right represents wind speed control, which is divided into three levels. The first level of wind speed is low speed (indicator light is green), the second level is medium speed (indicator light is blue), and the third level is high speed (indicator light is red).
5. When the battery switch is turned on, any press of the wind speed button or temperature button can start the hair dryer, but when it is turned off, it can only be turned off by pressing the wind speed switch. Regardless of the wind speed and temperature buttons, they operate in a cycle mode from low to medium to high to off to low.
6. During the use of the hair dryer, try to hold the connection between the air duct and the battery with your hands as much as possible, and do not shake the hair dryer too hard to avoid poor touch
between the battery and the air duct when shaking the hair dryer excessively.
7. After use, turn off the battery main switch and push to 0 in a timely manner. After using up the battery, turn off the battery switch and charge it as soon as possible. Try to charge it within one to two weeks to avoid damaging the battery due to energy depletion; When not in use for short term storage, we recommend separating the air duct from the battery. Before separating, simply push the lock between the air duct and the battery to the left to unlock it, and the battery can be removed.
8. The USB interface is suitable for power supply of conventional digital products, with an output of DC5V 2A. When using the USB interface, the battery main switch needs to be turned to the I position. When the USB interface is powered on, a red light can be seen from inside the USB interface.
.
Package List:
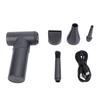
1 x Air Duct
1 x Handle with Built in Battery
1 x Nozzle
1 x Charging Base
1 x Fast Charging Cable USB Converter Charger
1 x User Manual
Note:
During use and charging, the battery and charger may heat up, which is normal. If there is severe heating causing the plastic to soften, deform, or bulge, please stop using it immediately.